Thursday, June 21, 2012

Baby Girl Bedroom

Hi there! The kids' rooms aren't completely finished, but they're getting there. We still have our youngest in a crib, and will keep her there as long as we can. To put it mildly, she is a wild thing and I really don't want to worry about her wandering around in the middle of the night. I can pretty much guess where she would be though: pilfering through the pantry for some snacks. So anyway, in her bedroom we have the crib and we recently purchased a twin bed for her room as well. Our new home only has 3 bedrooms, and when our family visits from out of state they tend to stay a while (we like it that way). So until we get the basement finished out, we put the king size bed in our oldest son's bedroom and guests will stay there while he has a slumber party in sissy's bedroom. It worked out really well when my parents were here for 3 weeks helping us move. So here are some pics of M's room.


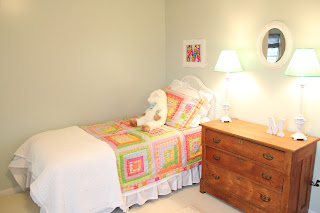
I scored this antique dresser in the pic above at a resale shop for $40.00. I had plans to paint it, but I've decided to leave it in its original state. It is over 100 years old, and I can't bring myself to update it....some things are better left as is :)

 The only thing that is new in M's room is the twin mattress and boxsprings. Most eveyone knows I am a bargain hunter to the extreme, but I don't do used mattresses. I did however get the bedframe and wicker headboard at a garage sale for $5 total.
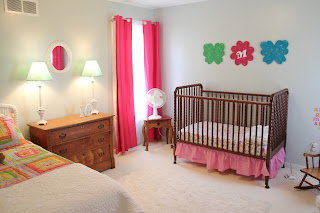
 The Jenny Lind crib is a hand-me-down from Clint's side of the family. I found the Pottery Barn crib bedding at a garage sale in Edmond, Ok for $3. It had never been used, and actually still had the tags on it.
 The Jenny Lind rocker was a garage sale find from my Mom, as was the wicker bookshelf.
I found the hot pink panels at Wal-mart for $12.99 each.
 The "artwork" above the crib are actuallly felt placemats from Bed Bath & Beyond for .99 a piece. I figure if the little monkey pulls them down, they will be pretty harmless!
 The button monogram was a project I did back in Oklahoma when visiting my parents. I would never get anything done like this at my house; hot glue and my 20 month old do not mix. And the kid never naps for more than 30 minutes, which is how long it takes for a shower....
 The alphabet behind the rocking chair is a vinyl cling from the Dollar Tree.

The milk glass mirror is a garage sale find from my mother that I love. The turquoise lampshades were a find from the Christmas Tree Shop for $5.99 each.

This bedroom was definitely done "on a dime". Here is the breakdown:

Twin Quilt: $3.00 - Garage Sale
Twin Headboard and frame: $5.00 - Garage Sale
Dresser: $40.00 - Resale Shop
Crib: Free - hand-me-down
Crib Artwork: $3.00 -  Bed Bath & Beyond
Crib Bedding (Pottery Barn) : $3.00 - Garage Sale
Window Panels: (4) at $12.99 ea - Wal-mart
Rocker: Free - Garage Sale
Wicker Bookcase: Free - Garage Sale

Grand total: $106.00


The day the countertops came

Picking out the countertops turned out to be an easier decision than I initially thought it would be. Ultimately, we were deciding between quartz and granite and originally I thought we would go with quartz. I had heard and read about the cons of granite being the hassle of sealing them, but after talking with more and more professionals, we came to realize that sealing the granite just isn't a big deal at all. Personally, I like the natural look of granite and that it isn't a complete uniform pattern (like quartz), but I understand those who prefer the uniformity of quartz. Just a personal preference; I don't think you can really go wrong with either one. So my husband and I had looked at granite at the big box stores, and were pretty surprised at how expensive it is there, especially compared to quartz. So we expanded our search to the Chicago area and found a wholesale granite distributor and we went and picked out our slabs. That was a fun process, and I highly recommend picking your own slabs if you ever go the granite route. No surprises about how it will look when it is installed, and if there are veins you want to avoid you can express that. I knew I wanted a lighter color granite since the kitchen cabinets are cherry and we have wood floors. We chose White Kashmire. It turned out so nice and looks great with the stainless steel appliances and the cherry cabinetry.

I was surprised the countertops were hauled over on the back of a small truck. I guess I was expecting something a little bigger? Anyway, I thought this was funny.

The employees of the granite factory are all from Poland. And of course they speak in their native tongue the entire time. I can't be sure, but most of the time it sounded like all explitives while they were doing the installation :) And man do these guys earn their money! I really did feel bad watching them carry this stuff up the front steps. They told me the island slab weiged around 800 lbs. One of the guys banged up his shoulder carrying this in. And while I don't know how much these men make in a day, I can tell you it's not enough. 

 These two DID enjoy watching the show!
 And this little monkey will only sit still if she has a snack. So we do lots and lots of snacks around here.
 So here is the kitchen in its current stage. We still need to decide what kind of backsplash we want and what material to use on the back of the island. For the island, we are thinking cherry beadboard or possibly a stone material that would match the fireplace wall.
 The fireplace wall on the left side of this picture is what I'm referring to. It will be wrapped in some kind of stone....don't know on that yet either :)
 We chose to do a 10 inch overhang on one end of the island so we can have seating there. On the other side of the island, it would be too close to the fridge and dishwasher to have a barstool there.

 The gas line still needs to be ran from the basement up through the cabinet beneath the cooktop, which is why that drawer is off the hinges right now.

So that is what the kitchen looks like now. We ended up paying $31 per sq ft on the granite, which did include installation. This price was so much cheaper than anywhere else we looked, so we're happy with not only how it turned out, but the reasonable price as well.

Tuesday, June 12, 2012

Master Bedroom

It has been busy, busy, BUSY around here. Our days have been filled with lots of unpacking, organizing and more of the same. And now we FINALLY have a room that is (somewhat) finished. And by finished, I mean the room is clear of boxes! Here is what the master bedroom looks like currently. I love the view from this room; it looks out onto farmland and the pond out front.


There were no window treatments whatsoever in this house when we moved in, and I decided to take the simple and clean approach. I chose plain white panels for most of the house. A bit boring perhaps, but I love them. We've had wooden blinds throughout two of our previous homes, and they're just not for me. Why, you ask? Too much dust. I hate to dust, so I am simplifying things. When these get dusty, throw them in the washing machine and problem solved. I also wanted to avoid obstructing the view from the windows; it's just too purty to cover up!